一部のNVIDIAユーザーは、コンピューターでNVIDIAドライバーをアップグレードしようとしたときに問題が発生したと報告しています。アップグレードプロセスが完了していないため、「NVIDIAインストーラーが失敗しました」というエラーメッセージが表示されます。これは通常、古い/互換性のないドライバーがユーザーのコンピューターにインストールされているために発生します。同じ問題に直面している場合でも、心配する必要はありません。デバイスでこれらの修正を試みるだけで、問題はすぐに解決します。ただし、修正を行う前に、これらの最初の回避策を試し、問題が解決したかどうかを確認してください-
初期の回避策–
1.コンピューターを再起動します。ここで、NVIDIAドライバーを再度更新して、問題が解決しないかどうかを確認します。
2.一時的に、システムのウイルス対策とファイアウォールを無効にします。ここで、ドライバーを再度更新してみてください。
それでもエラーメッセージが表示される場合は、この修正を行ってください-
修正-1NVIDIAプロセスを終了し、NVIDIAフォルダーを削除します-
1. Ctrl + Shift + Enterを押して、タスクマネージャーを開きます。
2.ここで、[プロセス]タブで下にスクロールすると、システムで実行されているNVIDIAプロセス(「NVIDIAコンテナ」プロセスなど)が表示されます。
3.各プロセスを右クリックし、「タスクの終了」をクリックして、これらのプロセスをすべて終了します。
これらのプロセスがシステムで実行されていることを確認する必要があります-
NVIDIAバックエンド(32ビット)NVIDIAドライバーヘルパーサービスNVIDIAネットワークサービス(32ビット)NVIDIA設定NVIDIAユーザーエクスペリエンスドライバーコンポーネント

4.ファイルエクスプローラーウィンドウを開き、ハードドライブのこの場所に移動します-
C:\ Windows \ System32 \ DriverStore \ FileRepository \
フォルダを下にスクロールして、名前に以下の項目が含まれているフォルダを見つけて削除します-
nvdsp.inf
nv_lh
nvoclock

4.次に、ファイルエクスプローラーで、これらのフォルダーに移動して空にします-
C:\ Program Files \ NVIDIA Corporation \
C:\ Program Files(x86)\ NVIDIA Corporation \

5.再起動し、コンピュータとフォローの再起動後に修正-6をお使いのコンピュータ上で手動でNVIDIAドライバをインストールします。
修正2–コマンドプロンプトの使用
1.管理者としてコマンドプロンプトを開きます。
2.コマンドウィンドウで以下のコマンドを1つずつ実行します。
bcdedit -set loadoptions DISABLE_INTEGRITY_CHECKS bcdedit -set TESTSIGNING ON
3.ここで、コンピューターを再起動して、再試行してください。あなたの問題は解決されます。
4.その後、adminとしてコマンドプロンプトを再度開き、以下のコマンドを実行して、以前と同じようにします。
bcdedit -set loadoptions ENABLE_INTEGRITY_CHECKS bcdedit -set TESTSIGNING OFF
修正-4デバイスマネージャーからNVIDIAドライバーを更新する-
1.キーボードから「Windowsキー+ X」を押した後、「デバイスマネージャ」をクリックします。
デバイスマネージャユーティリティが開きます。

2. [ デバイスマネージャ]ウィンドウが表示されたら、[アダプタの表示]セクションを見つけます。
3.次に、ドロップダウンから、使用しているグラフィックスドライバーを右クリックします。次に、「ドライバの更新」をクリックします。

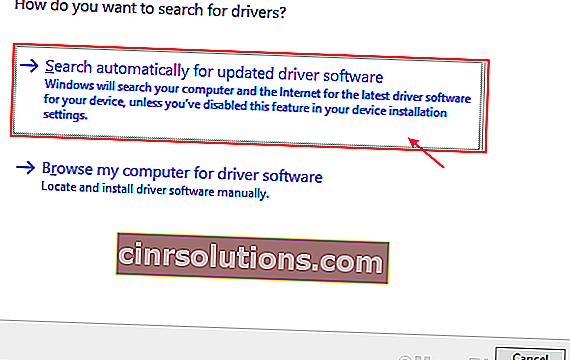
3.次のウィンドウで、「更新されたドライバーソフトウェアを自動的に検索する」というオプションを選択します。
更新プロセスが終了したら、[デバイスマネージャ]ウィンドウを閉じます。
コンピュータを再起動します。
修正-3NVIDIAドライバーを手動でインストールする-
1.まず、GoogleChromeを起動します。
2.次に、「Nvidiaドライバー」を検索します
3.その後、「ドライバーのダウンロード| NVIDIA」をクリックする必要があります。

4. . Now, in this window, under ‘NVIDIA Driver downloads’ section choose “Product type“, “Product series“, “Product“, “Operating System“, “Windows Driver Type“, “Download Type” according to your driver specifications.
5. Once you have selected your product, click on the “Search“.

6. Then, click on “Download” to download the driver.

Close the browser.
7. Locate the downloaded application on your disk.
8. Then, double click on it to start the installation process of the driver.

9. Now, in the NVIDIA Graphics Driver window, click on “NVIDIA Graphics Driver and GeForce Experience” and click on “Agree and continue“.

10. Under Installation Options, choose “Express (Recommended)” and click on “Next” to start the installation process.

11. After installation is done, click on “Close” to close the NVIDIA Graphics Driver Installer window.

Restart your computer to finish the installation process.
If you are still facing the problem during the installation, perhaps performing a clean installation of the NVIDIA driver can help you out.
Fix-4 Perform a Clean install
[NOTE– Performing a clean installation will clear any kind of custom settings of the driver on your device. But it will remove any further errors in the NVIDIA installer from your device.]
The NVDIA installer you downloaded during the manual installation (i.e. the Fix-6)will be used in this fix.
1. Go to the location where the installer is located on your computer.
2. When you are in that location, double click on the installer to start the installation.
3. In the NVIDIA Installer window, choose the option “NVIDIA Graphics Driver and GeForce Experience“.
4. Then, click on “Agree and continue“.
5. Now, choose “Custom installation“.
6. Click on “Next” to start the installation process.

7. Now, checkthe “Perform a clean installation” option.
8. Finally, click lick on “Next“.

After installation is done, click on “Close” to close the NVIDIA Graphics Driver Installer window.
Restart your computer to finish the installation process.
You should not face any further issues with the installation of the NVIDIA driver.
Fix-5 Use Display Driver Uninstaller-
1. Download the DDU.zip on your device and after downloading it, unzip the folder in a favorable location of your choice.

2. Now, press Windows Key+R to launch Run, and “control printers” and hit Enter to open Device and Printers window in Control Panel.

3. Now, right-click on your computer name and then click on “Device installation settings“.

4. Now, choose “No (your device might not work as“ expected) and click on “Save Changes“.

Close the Devices and Printers window.
5. Then, google “Nvidia drivers” from your browser and click on “Download Drivers|NVIDIA“.
6. Now, in this window, under ‘NVIDIA Driver downloads’ section choose “Product type“, “Product series“, “Product“, “Operating System“, “Windows Driver Type“, “Download Type” according to your driver specifications.
Once you have chosen the right driver for you computer, click on the “Search“.
7. Click on “Download” to start the downloading process.
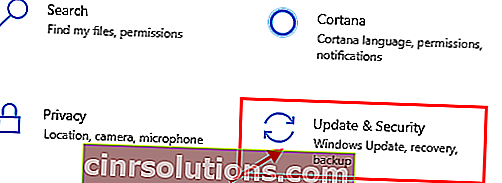
8. Press Windows Icon+I to open Settings application, now click on “Update and Security“.
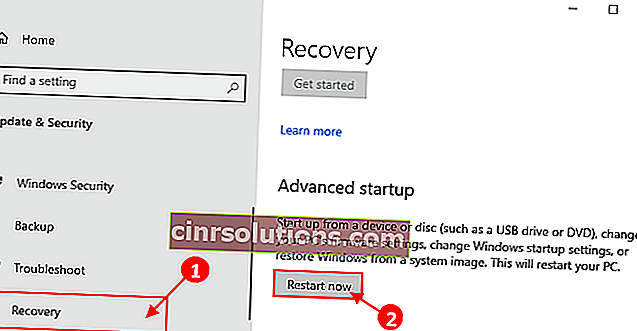
9. Now, on the left pane, click on “Recovery“,
Then, on the right-hand side of the screen, click on “Restart Now” under Advanced Startup.
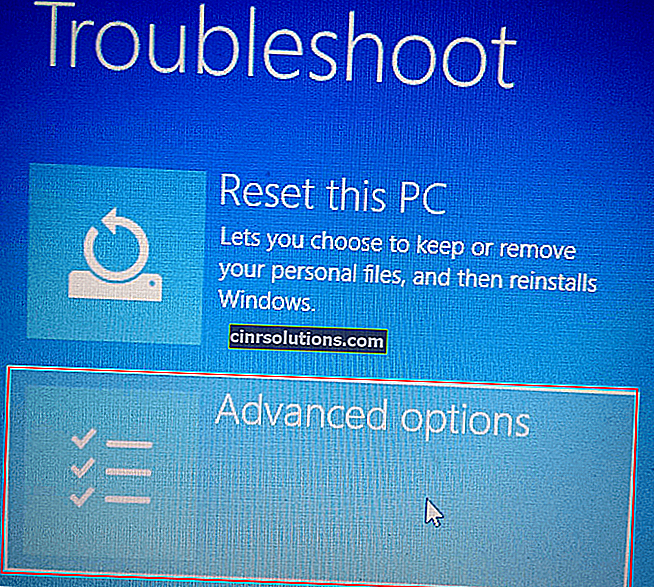
10. Then click on “Advanced options“.
11. Now, within the Advanced options window, click on the “Startup Settings“.

12. Then, click on “Restart”.

13. Now, just press 4 from your keyborad to “Enable Safe Mode“.

In Safe mode, the background of your desktop will be black.
14. Now, navigate to the file location where you have extracted DDU.zip. Double click on “DDU v18.1.0.9” to extract the main files.
Go to the extracted folder, and double click on the “Display Driver Installer” to run it on your device.

15. Now, in the Display Driver Uninstaller window, on the left-hand side, click on the drop-down beside “Select device type” and click “GPU” and finally click on “Clean and Restart“.

16. This will uninstall the NVIDIA driver from your system and you will be booted to normal mode again.
17. Now, you have to boot into safe mode again ( follow the instructions in Step-8 to Step-13 of this fix).
18. After booting into safe mode, locate the downloaded application on your disk.
19. Now, double click on it to start the installation process of the driver.
20. Once the installation process has finished, click on “Close” to close the NVIDIA Graphics Driver Installer window.
Restart your computer to finish the installation process.
21. After rebooting, press Windows Key+R and write “control printers“.
22. Click on “OK“.
24. Now, right-click on your computer name and then click on “Device installation settings“.
25. Now, choose “Yes (recommended)” and click on “Save Changes“.

You should not face any further issues with the installation of the NVIDIA driver.
Fix-6 Perform Clean Boot-
1. To open the Run terminal on your desktop, press Windows key+R.
2. Then, type “msconfig” and after that, click on “OK“.

3. After that go to the “General” tab
4. In the General tab, uncheck the box beside the “Load startup items“.
5. Finally, you have to make sure the “Load system services” is checked.

6. Now, click on the “Services” tab.
7. Click once beside the option “Hide all Microsoft services” to check it.
8. To disable all these services, click on the “Disable all“.
9. Now, click on “Apply” and “OK“.

Reboot your computer, it will be booted in clean mode.
Fix-7 Rollback the existing display adapter-
1. At first, right-click on the Windows icon and then click on the “Device Manager“.
Device Manager utility will open.
2. In the Device Manager window, find “Display adapters” from the list, click on it to expand it.
3. Now, from the drop-down double click on the NVIDIA graphics driver, you are using. The properties window will open.

3. [ プロパティ]ウィンドウで、[ドライバ]タブに移動します。「ロールバックドライバ」をクリックします。「OK」をクリックします。 これにより、NVIDIAグラフィックスドライバーの古い更新がロールバックされ、古いバージョンのドライバーに置き換えられます。

4.さて、「なぜロールバックするのですか?」が表示されたら、「私のアプリはこのドライバーで動作しません」を選択します。
5.次に、「はい」をクリックして、ロールバックプロセスを開始します。

デバイスマネージャウィンドウを閉じます。
コンピュータを再起動します。再起動後、エラーなしでドライバーを更新できるはずです。